
Fabric Crafts with Children
My daughter loves doing craft projects. Every day, I hear "Mommy, what can I make today?" Our house is covered with crayon drawings, paintings, collages, paper and felt flowers, sand art, and many other beautiful but space-consuming objects d'art.
Even with her constant happiness at giving away her masterpieces to anyone she encounters (including anyone who comes to our door), we are constantly in danger of being buried under her ever growing portfolio. It's getting worse now, since her little brother is always anxious to "help" and make his own pictures just like her.
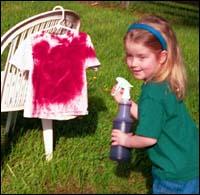
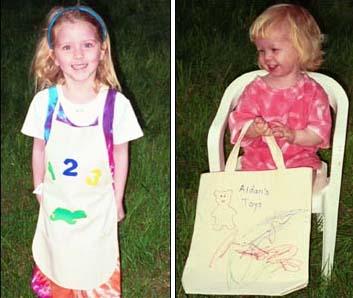 Maura models the sponge-painted apron, while Aidan shows off his way-cool stenciled tote bag and glue-batiked t-shirt |
After a while, I started looking for ideas for craft projects that would do more than just sit and look nice. I remember making tie-dye shirts, but Maura is definitely not old enough for that project. Still, that memory planted the seed that eventually developed into several other fabric craft projects that WERE more age-appropriate to her (and even one that her 21-month-old brother can also do).
After some trial and error, we have discovered three types of projects that work really well: Fabric pen stencil and drawing; sponge painting; and glue batik. All three are reasonably easy to do, and only somewhat messy (the fabric pens are the least messy, the batik the most so).
The following fabric crafts can be (and have been, as can be seen by the accompanying photos) done safely by kids--with adult supervision, of course--and will leave you with useful and decorative items for your home.
All of the projects involve paints of some sort, so a smock or old shirt is a good idea! Make sure the work area is also properly protected from any accidental drips. All of the supplies can be easily found in most craft or fabric stores.
If your family is anything like ours, there's always a need for more bags to carry things around. Both of my children now have personalized toy bags to use when travelling, and many of their young friends will be receiving similar items as gifts over the next few months. This is a great craft--any child who can put pen to fabric can "make" his own bag!
Supplies:
Fabric tote bag
Permanent Fabric Pens (available in many colors)
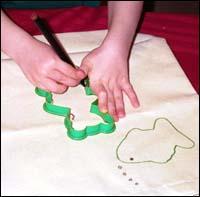
Stencils (Hint: cookie cutters make GREAT stencils--they usually are larger and have easier-to-trace shapes than traditional stencils)
Instructions:
Smooth the fabric of the tote bag before starting (iron if necessary). Depending on the abilities of your child, and your desire for recognizable shapes, either trace or let your child trace stencil shapes onto the bag with the fabric pens. Let the kids finish decorating the bag in any way they wish--color in the designs, add their names, do freehand drawings of their own.
This is a good starting project, as the finished smock can then be used to protect clothing when doing other crafts.
Supplies:
Cloth apron
Fabric paints
Shaped sponges (either the kind that come pre-cut or cut your own shapes)
Paint tray (any tray or plate will work)
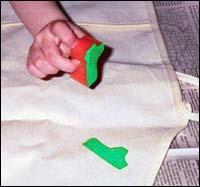
Instructions:
Cover the table with newspaper before starting, as this craft can be messy. Place the smock on the table, smooth out fabric as needed. Squirt fabric paint onto a sponge. To make sure the entire surface is well- covered, put the sponge paint side down on the paint tray, and swirl around a bit. Add more paint as needed. Carefully place the sponge, paint down, onto the smock. Press down firmly (some paint may leak through onto your hands--soap and water will remove it). Carefully remove the sponge. Repeat as desired with other sponges. Let the paint dry overnight.
Normally, batik is done using melted wax to make the designs. Since this isn't a safe method to use with children, glue is used instead.
Supplies:
White T-shirt
White glue
Paintbrush
Cold water dye
Spray bottle
Instructions:
This is a project for nice weather, as you will want to do the painting outdoors. Place a sheet of cardboard or several pieces of newspaper inside the T- shirt. Using glue, paint designs on one side of the shirt. Everywhere there is glue, dye will not stick to the shirt. The thicker the glue, the closer to pure white the shirt will remain. Once the glue is dry, turn the shirt over and repeat the process.
Mix the dye according to package directions, and carefully pour into the spray bottle. Hang the shirt outside, and spray with paint. (To avoid getting paint on your hands, use rubber gloves.) The shirt doesn't have to be evenly covered; the dye will run, and uneven dying will add to the batik design.
Let the dye dry overnight, then rinse the shirt in cold water to remove glue. Some dye will also come out at this time. To set the remaining dye, wash in hot water. Let the shirt air dry.
The above are only a few of the many projects that can be done with fabric painting. The techniques can be mixed and matched--at my daughter's birthday party, she and her guests all made sponge painted t- shirts (hint: if you have more than one child doing this project, it's a good idea to have extra adults on hand to help out). See the accompanying list for more ideas, or come up with your own. The possibilities are nearly endless!
More Ideas
|
Noël-Marie Taylor is a freelance writer located in Columbia, Maryland. Her work has appeared in many magazines, including PC Magazine and The Mother Is Me. A stay-at-home mom to two children, she is also the designer of several cross-stitch kits for children.