
Painting Pressboard Furniture
When my husband and I first married, the only furniture we had was three assemble-it-yourself TV stands, a desk, two dressers and a small bookshelf. Coming straight out of college with no funds to buy 'real' furniture, and yet wanting to set up a household that didn't look like a dorm room, I had to use my creativity to make do with what little we owned.
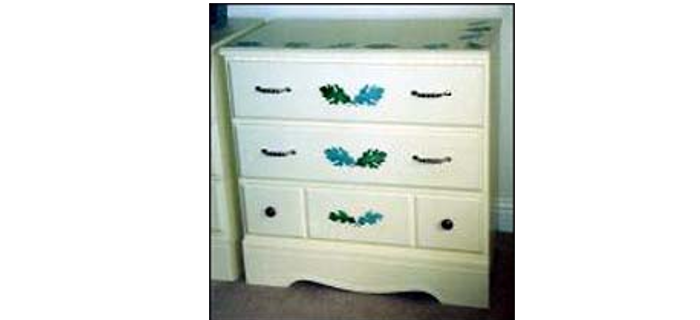
We kept the desk and the bookshelf and threw out the television stands. Turning to the dressers, I knew I didn't want them sitting in my bedroom looking the way they did. Each pressboard dresser had three drawers and was covered in a paperlike, dark faux-woodgrain finish. A few knobs and one handle were missing, but otherwise they were in good shape.
Having refinished an old sewing table a few months earlier, I knew how to strip, sand and stain genuine wood, but it took me a while to figure out how to improve the look of pressboard and plywood. When I did, I had some beautiful, functional furniture and I had spent just $25 for materials.
How to do it
You can use this technique on any piece of furniture made of the same materials: bookshelf, coffee table, etc.
Step 1
Separate the furniture into its separate components (drawers, adjustable shelves, etc). Wipe each piece with a clean rag to get rid of dust and dirt. Remove all hardware such as drawer pulls or handles.
Step 2
Using a foam brush, paint each piece with white primer (using a bristle brush leaves streaks because of the smooth surface of the furniture). How many coats you apply depends on how dark the furniture 'finish' is; you want to completely cover the surface so you can't see any dark areas peeking through. I used three coats of primer, allowing each coat to dry before applying the next one.
Step 3
Paint over the primer with whatever color of acrylic paint you choose. I used an off-white color and applied three coats, again allowing drying time between each coat. If you're using a darker shade you may not need as many coats, but do make sure you can't see any of the original finish.
Step 4
After getting the base color finished, you can add detail if you like. I used various leaf stencils to make a border around the tops of the dressers and to decorate the drawer fronts. You could also sponge-paint, paint freehand, decoupage, or whatever technique works with you and your décor.
Step 5
When all of the painting has been completed and you're happy with the way it looks, paint the furniture with several coats of clear acrylic varnish. This will seal the paint and keep it from becoming nicked or scratched.
Step 6
If your furniture has drawer pulls or handles, you may want to replace them with something that gives your piece a more finished look. I replaced the old dull gold-finish pulls and handles with silver antiqued-looking ones that I found at a local home improvement store, and that was it---my dressers were complete!
Amy Gray has a bachelors degree in magazine journalism from Ohio University. Amy is a homemaker and mom to three cats: Mulder, Scully and Piper. She enjoys knitting and cross-stitching as well as tatting, and is currently trying to teach herself to crochet.